一.LNMP简介
1.含义
2.工作原理
LNMP%E7%8E%AF%E5%A2%83-toc" style="margin-left:0px;">二.部署LNMP环境
Nginx%E7%8E%AF%E5%A2%83-toc" style="margin-left:40px;">1.Nginx环境
(1)上传nginx包,下载编译安装工具并解包到指定目录(tar 参数 tar包 - C 目录路径)
(2) 开始编译安装,每次编译后会出现一些包确实报错,按照报的包名安装完成即可,安装好又继续编译
(3)直到出现这个界面就可以开始安装
(4)配置nginx的service启动
2.Mysql环境
(1)如下新增yum库
(2)安装MariaDB-client.x86_64和MariaDB-server.x86_64并启动mariadb
(3)设置数据库密码并登录
PHP%E7%8E%AF%E5%A2%83-toc" style="margin-left:40px;">3.PHP环境
PHP%E7%9B%B8%E5%85%B3%E5%8C%85-toc" style="margin-left:80px;">(1)新增扩展源,安装PHP相关包
(2)启动php-fpm
(3)到安装nginx目录下去修改nginx.conf文件,找到这部分内容并取消注释1,更改为时间html文件存放路径
(4)重启nginx
LNMP%E7%8E%AF%E5%A2%83-toc" style="margin-left:0px;"> 三.简单测试LNMP环境
到上面nginx配置文件指定的html目录中新建php文件,"phpinfo();"会显示php环境的相关信息
LNMP%E7%AE%80%E4%BB%8B">一.LNMP简介
1.含义
LNMP分贝指的是Linux、Nginx、Mysql、PHP首字母缩写,四者组合起来工作
2.工作原理
用户通过浏览器输入域名时首先访问的是nginx的web服务静态页面由nginx处理,“.php”的动态文件就会由nginx利用FastCGI(可伸缩、高速的在http服务器和脚本语言之间通信的接口,Linux下这个交口是socket,会把动态语言文件和http服务器分离开处理,让http服务器专心处理静态页面,自己将动态页面处理好返给http服务器)接口交给PHP引擎处理解析,若是还要读取数据库信息,则PHP又继续向mysql数据库发出请求,处理完成后再将数据返回给用户
LNMP%E7%8E%AF%E5%A2%83">二.部署LNMP环境
Nginx%E7%8E%AF%E5%A2%83" style="background-color:transparent;">1.Nginx环境
(1)上传nginx包,下载编译安装工具并解包到指定目录(tar 参数 tar包 - C 目录路径)
[root@localhost src]# ll
total 1052
drwxr-xr-x 8 1001 1001     158 May 24  2022 nginx-1.22.0
-rw-r--r-- 1 root root 1073322 Aug  9 19:20 nginx-1.22.0.tar.gz
[root@localhost src]# cd nginx-1.22.0/
[root@localhost nginx-1.22.0]# yum install -y gcc gcc-c++ devel make
[root@localhost nginx-1.22.0]# ll
total 800
drwxr-xr-x 6 1001 1001    326 Aug 12 10:03 auto
-rw-r--r-- 1 1001 1001 317070 May 24  2022 CHANGES
-rw-r--r-- 1 1001 1001 484445 May 24  2022 CHANGES.ru
drwxr-xr-x 2 1001 1001    168 Aug 12 10:03 conf
-rwxr-xr-x 1 1001 1001   2590 May 24  2022 configure
drwxr-xr-x 4 1001 1001     72 Aug 12 10:03 contrib
drwxr-xr-x 2 1001 1001     40 Aug 12 10:03 html
-rw-r--r-- 1 1001 1001   1397 May 24  2022 LICENSE
drwxr-xr-x 2 1001 1001     21 Aug 12 10:03 man
-rw-r--r-- 1 1001 1001     49 May 24  2022 README
drwxr-xr-x 9 1001 1001     91 Aug 12 10:03 src
(2) 开始编译安装,每次编译后会出现一些包确实报错,按照报的包名安装完成即可,安装好又继续编译
[root@localhost nginx-1.22.0]# ./configure --prefix=/etc/nginx --sbin-path=/usr/sbin/nginx --modules-path=/usr/lib64/nginx/modules --conf-path=/etc/nginx/nginx.conf --error-log-path=/var/log/nginx/error.log --http-log-path=/var/log/nginx/access.log --pid-path=/var/run/nginx.pid --lock-path=/var/run/nginx.lock --http-client-body-temp-path=/var/cache/nginx/client_temp --http-proxy-temp-path=/var/cache/nginx/proxy_temp --http-fastcgi-temp-path=/var/cache/nginx/fastcgi_temp --http-uwsgi-temp-path=/var/cache/nginx/uwsgi_temp --http-scgi-temp-path=/var/cache/nginx/scgi_temp --user=nginx --group=nginx --with-compat --with-file-aio --with-threads --with-http_addition_module --with-http_auth_request_module --with-http_dav_module --with-http_flv_module --with-http_gunzip_module --with-http_gzip_static_module --with-http_mp4_module --with-http_random_index_module --with-http_realip_module --with-http_secure_link_module --with-http_slice_module --with-http_ssl_module --with-http_stub_status_module --with-http_sub_module --with-http_v2_module --with-mail --with-mail_ssl_module --with-stream --with-stream_realip_module --with-stream_ssl_module --with-stream_ssl_preread_module --with-cc-opt='-O2 -g -pipe -Wall -Wp,-D_FORTIFY_SOURCE=2 -fexceptions -fstack-protector-strong --param=ssp-buffer-size=4 -grecord-gcc-switches -m64 -mtune=generic -fPIC' --with-ld-opt='-Wl,-z,relro -Wl,-z,now -pie'

[root@localhost nginx-1.22.0]# yum install -y pcre-devel

[root@localhost nginx-1.22.0]# ./configure --prefix=/etc/nginx --sbin-path=/usr/sbin/nginx --modules-path=/usr/lib64/nginx/modules --conf-path=/etc/nginx/nginx.conf --error-log-path=/var/log/nginx/error.log --http-log-path=/var/log/nginx/access.log --pid-path=/var/run/nginx.pid --lock-path=/var/run/nginx.lock --http-client-body-temp-path=/var/cache/nginx/client_temp --http-proxy-temp-path=/var/cache/nginx/proxy_temp --http-fastcgi-temp-path=/var/cache/nginx/fastcgi_temp --http-uwsgi-temp-path=/var/cache/nginx/uwsgi_temp --http-scgi-temp-path=/var/cache/nginx/scgi_temp --user=nginx --group=nginx --with-compat --with-file-aio --with-threads --with-http_addition_module --with-http_auth_request_module --with-http_dav_module --with-http_flv_module --with-http_gunzip_module --with-http_gzip_static_module --with-http_mp4_module --with-http_random_index_module --with-http_realip_module --with-http_secure_link_module --with-http_slice_module --with-http_ssl_module --with-http_stub_status_module --with-http_sub_module --with-http_v2_module --with-mail --with-mail_ssl_module --with-stream --with-stream_realip_module --with-stream_ssl_module --with-stream_ssl_preread_module --with-cc-opt='-O2 -g -pipe -Wall -Wp,-D_FORTIFY_SOURCE=2 -fexceptions -fstack-protector-strong --param=ssp-buffer-size=4 -grecord-gcc-switches -m64 -mtune=generic -fPIC' --with-ld-opt='-Wl,-z,relro -Wl,-z,now -pie'

[root@localhost nginx-1.22.0]# yum install -y openssl-devel

[root@localhost nginx-1.22.0]# ./configure --prefix=/etc/nginx --sbin-path=/usr/sbin/nginx --modules-path=/usr/lib64/nginx/modules --conf-path=/etc/nginx/nginx.conf --error-log-path=/var/log/nginx/error.log --http-log-path=/var/log/nginx/access.log --pid-path=/var/run/nginx.pid --lock-path=/var/run/nginx.lock --http-client-body-temp-path=/var/cache/nginx/client_temp --http-proxy-temp-path=/var/cache/nginx/proxy_temp --http-fastcgi-temp-path=/var/cache/nginx/fastcgi_temp --http-uwsgi-temp-path=/var/cache/nginx/uwsgi_temp --http-scgi-temp-path=/var/cache/nginx/scgi_temp --user=nginx --group=nginx --with-compat --with-file-aio --with-threads --with-http_addition_module --with-http_auth_request_module --with-http_dav_module --with-http_flv_module --with-http_gunzip_module --with-http_gzip_static_module --with-http_mp4_module --with-http_random_index_module --with-http_realip_module --with-http_secure_link_module --with-http_slice_module --with-http_ssl_module --with-http_stub_status_module --with-http_sub_module --with-http_v2_module --with-mail --with-mail_ssl_module --with-stream --with-stream_realip_module --with-stream_ssl_module --with-stream_ssl_preread_module --with-cc-opt='-O2 -g -pipe -Wall -Wp,-D_FORTIFY_SOURCE=2 -fexceptions -fstack-protector-strong --param=ssp-buffer-size=4 -grecord-gcc-switches -m64 -mtune=generic -fPIC' --with-ld-opt='-Wl,-z,relro -Wl,-z,now -pie'
(3)直到出现这个界面就可以开始安装
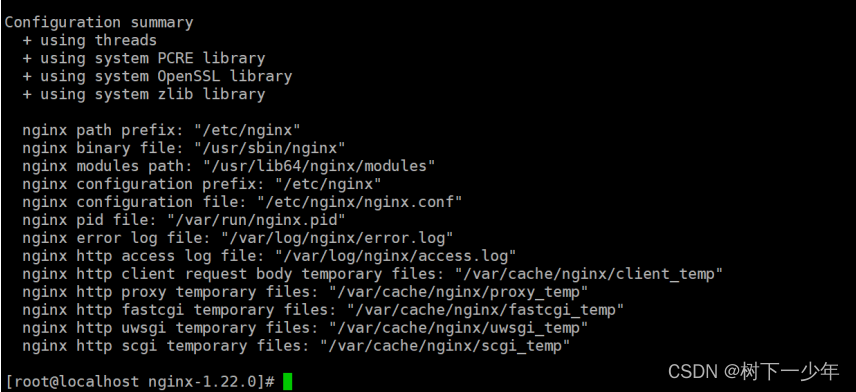
[root@localhost nginx-1.22.0]# make
[root@localhost nginx-1.22.0]# make install
[root@localhost nginx-1.22.0]# nginx -v
nginx version: nginx/1.22.0
(4)配置nginx的service启动
[root@localhost ~]# whereis nginx
nginx: /usr/sbin/nginx /etc/nginx

[root@localhost ~]# vim /usr/lib/systemd/system/nginx.service
[Unit]
Description=nginx - high performance web server
Documentation=http://nginx.org/en/docs/
After=network.target remote-fs.target nss-lookup.target
[Service]
Type=forking
PIDFile=/run/nginx.pid
ExecStartPre=/usr/sbin/nginx -t -c /usr/local/src/nginx-1.22.0/conf/nginx.conf
ExecStart=/usr/sbin/nginx -c /usr/local/src/nginx-1.22.0/conf/nginx.conf
#填上面你的设备查到的目录以及你的nginx.conf的所在位置
ExecReload=/bin/kill -s HUP $MAINPID
ExecStop=/bin/kill -s QUIT $MAINPID
PrivateTmp=true
[Install]
WantedBy=multi-user.target

[root@localhost ~]# systemctl restart nginx.service
[root@localhost ~]# systemctl status nginx.service
● nginx.service - nginx - high performance web server
   Loaded: loaded (/usr/lib/systemd/system/nginx.service; disabled; vendor preset: disabled)
   Active: active (running) since Sat 2023-08-12 23:10:12 CST; 6s ago
     Docs: http://nginx.org/en/docs/
  Process: 19217 ExecStop=/bin/kill -s QUIT $MAINPID (code=exited, status=0/SUCCESS)
  Process: 19225 ExecStart=/usr/sbin/nginx -c /usr/local/src/nginx-1.22.0/conf/nginx.conf (code=exited, status=0/SUCCESS)
  Process: 19222 ExecStartPre=/usr/sbin/nginx -t -c /usr/local/src/nginx-1.22.0/conf/nginx.conf (code=exited, status=0/SUCCESS)
 Main PID: 19226 (nginx)
   CGroup: /system.slice/nginx.service
           ├─19226 nginx: master process /usr/sbin/nginx -c /usr/local/src/nginx-1.22.0/conf/nginx.conf
           └─19227 nginx: worker process

Aug 12 23:10:12 localhost.localdomain systemd[1]: Starting nginx - high performance web server...
Aug 12 23:10:12 localhost.localdomain nginx[19222]: nginx: the configuration file /usr/local/src/nginx-1.22.0/conf/nginx.conf syntax is ok
Aug 12 23:10:12 localhost.localdomain nginx[19222]: nginx: configuration file /usr/local/src/nginx-1.22.0/conf/nginx.conf test is successful
Aug 12 23:10:12 localhost.localdomain systemd[1]: Failed to parse PID from file /run/nginx.pid: Invalid argument
Aug 12 23:10:12 localhost.localdomain systemd[1]: Started nginx - high performance web server.
2.Mysql环境
我使用的是mariadb
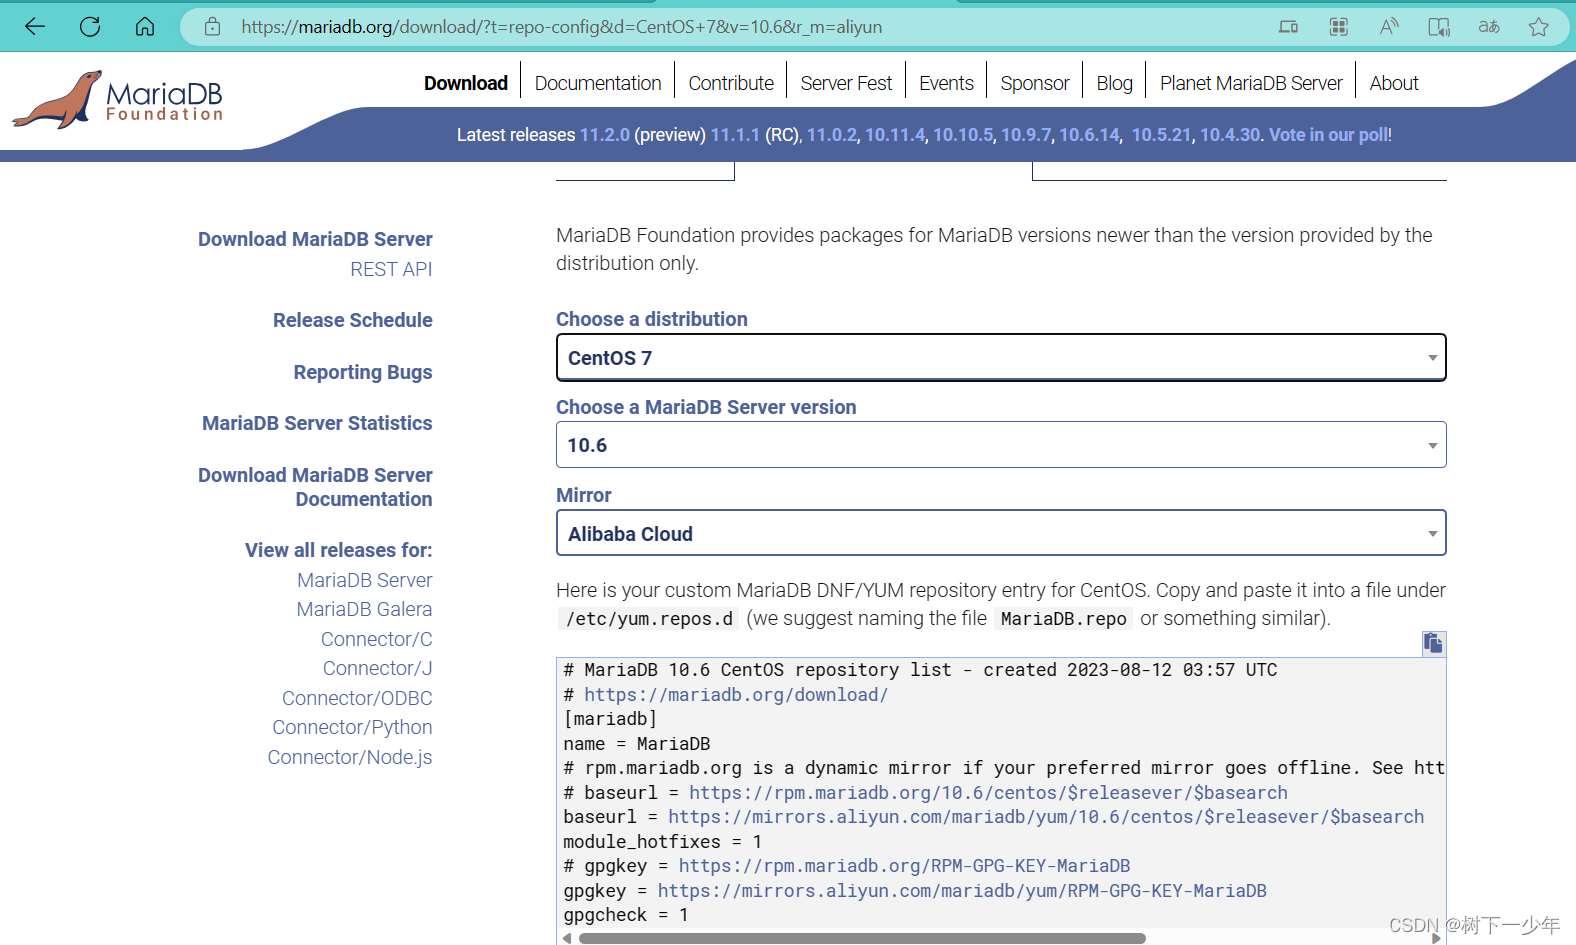
(1)如下新增yum库
[root@localhost yum.repos.d]# ll
total 8
-rw-r--r--. 1 root root  68 Jul 23 09:13 cdrom.repo
-rw-r--r--  1 root root 561 Aug 12 09:55 mariadb.repo

[root@localhost yum.repos.d]# vim mariadb.repo
# MariaDB 10.6 CentOS repository list - created 2023-08-12 01:54 UTC
# https://mariadb.org/download/
[mariadb]
name = MariaDB
# rpm.mariadb.org is a dynamic mirror if your preferred mirror goes offline. See https://mariadb.org/mirrorbits/ for details.
# baseurl = https://rpm.mariadb.org/10.6/centos/$releasever/$basearch
baseurl = https://mirrors.aliyun.com/mariadb/yum/10.6/centos/$releasever/$basearch
module_hotfixes = 1
# gpgkey = https://rpm.mariadb.org/RPM-GPG-KEY-MariaDB
gpgkey = https://mirrors.aliyun.com/mariadb/yum/RPM-GPG-KEY-MariaDB
gpgcheck = 1
(2)安装MariaDB-client.x86_64和MariaDB-server.x86_64并启动mariadb
[root@localhost yum.repos.d]# yum install -y MariaDB-client.x86_64 MariaDB-server.x86_64

[root@localhost yum.repos.d]# systemctl start mariadb

[root@localhost yum.repos.d]# systemctl status mariadb
● mariadb.service - MariaDB 10.6.14 database server
   Loaded: loaded (/usr/lib/systemd/system/mariadb.service; disabled; vendor preset: disabled)
  Drop-In: /etc/systemd/system/mariadb.service.d
           └─migrated-from-my.cnf-settings.conf
   Active: active (running) since Sat 2023-08-12 09:58:12 CST; 9s ago
     Docs: man:mariadbd(8)
           https://mariadb.com/kb/en/library/systemd/
  Process: 2759 ExecStartPost=/bin/sh -c systemctl unset-environment _WSREP_START_POSITION (code=exited, status=0/SUCCESS)
  Process: 2730 ExecStartPre=/bin/sh -c [ ! -e /usr/bin/galera_recovery ] && VAR= ||   VAR=`cd /usr/bin/..; /usr/bin/galera_recovery`; [ $? -eq 0 ]   && systemctl set-environment _WSREP_START_POSITION=$VAR || exit 1 (code=exited, status=0/SUCCESS)
  Process: 2728 ExecStartPre=/bin/sh -c systemctl unset-environment _WSREP_START_POSITION (code=exited, status=0/SUCCESS)
 Main PID: 2742 (mariadbd)
   Status: "Taking your SQL requests now..."
   CGroup: /system.slice/mariadb.service
           └─2742 /usr/sbin/mariadbd
Aug 12 09:58:12 localhost.localdomain mariadbd[2742]: 2023-08-12  9:58:12 0 [Note] InnoDB: File './ibtmp1' size is now 12 MB.
Aug 12 09:58:12 localhost.localdomain mariadbd[2742]: 2023-08-12  9:58:12 0 [Note] InnoDB: 10.6.14 started; log sequence number 41320; ...n id 14
Aug 12 09:58:12 localhost.localdomain mariadbd[2742]: 2023-08-12  9:58:12 0 [Note] InnoDB: Loading buffer pool(s) from /var/lib/mysql/i...er_pool
Aug 12 09:58:12 localhost.localdomain mariadbd[2742]: 2023-08-12  9:58:12 0 [Note] Plugin 'FEEDBACK' is disabled.
Aug 12 09:58:12 localhost.localdomain mariadbd[2742]: 2023-08-12  9:58:12 0 [Note] InnoDB: Buffer pool(s) load completed at 230812  9:58:12
Aug 12 09:58:12 localhost.localdomain mariadbd[2742]: 2023-08-12  9:58:12 0 [Note] Server socket created on IP: '0.0.0.0'.
Aug 12 09:58:12 localhost.localdomain mariadbd[2742]: 2023-08-12  9:58:12 0 [Note] Server socket created on IP: '::'.
Aug 12 09:58:12 localhost.localdomain mariadbd[2742]: 2023-08-12  9:58:12 0 [Note] /usr/sbin/mariadbd: ready for connections.
Aug 12 09:58:12 localhost.localdomain mariadbd[2742]: Version: '10.6.14-MariaDB'  socket: '/var/lib/mysql/mysql.sock'  port: 3306  MariaDB Server
Aug 12 09:58:12 localhost.localdomain systemd[1]: Started MariaDB 10.6.14 database server.
Hint: Some lines were ellipsized, use -l to show in full.
(3)设置数据库密码并登录
[root@localhost yum.repos.d]# mysql -uroot -p123456
Welcome to the MariaDB monitor.  Commands end with ; or \g.
Your MariaDB connection id is 7
Server version: 10.6.14-MariaDB MariaDB Server
Copyright (c) 2000, 2018, Oracle, MariaDB Corporation Ab and others.
Type 'help;' or '\h' for help. Type '\c' to clear the current input statement.

MariaDB [(none)]> show databases;
+--------------------+
| Database           |
+--------------------+
| information_schema |
| mysql              |
| performance_schema |
| sys                |
| test               |
+--------------------+

5 rows in set (0.001 sec)
PHP%E7%8E%AF%E5%A2%83" style="margin-left:.0001pt;text-align:justify;">3.PHP环境
PHP%E7%9B%B8%E5%85%B3%E5%8C%85" style="margin-left:.0001pt;text-align:justify;">(1)新增扩展源,安装PHP相关包
[root@localhost ~]# yum install epel-release
[root@localhost ~]# rpm -ivh http://rpms.famillecollet.com/enterprise/remi-release-7.rpm
[root@localhost ~]# yum --enablerepo=remi install php56-php php56-php-devel php56-php-fpm php56-php-gd php56-php-xml php56-php-sockets php56-php-session php56-php-snmp php56-php-mysql(2)启动php-fpm
[root@localhost conf]# find / -name php-fpm
/opt/remi/php56/root/etc/sysconfig/php-fpm
/opt/remi/php56/root/usr/sbin/php-fpm
/opt/remi/php56/root/var/log/php-fpm
/opt/remi/php56/root/var/run/php-fpm
[root@localhost conf]# /opt/remi/php56/root/usr/sbin/php-fpm
(3)到安装nginx目录下去修改nginx.conf文件,找到这部分内容并取消注释1,更改为时间html文件存放路径

[root@localhost ~]# cd /usr/local/src/nginx-1.22.0/conf/
[root@localhost conf]# vim nginx.conf
location ~ \.php$ {
            root           /usr/local/src/nginx-1.22.0/html;
            fastcgi_pass   127.0.0.1:9000;
            fastcgi_index  index.php;
            #fastcgi_param  SCRIPT_FILENAME  /scripts$fastcgi_script_name;
            fastcgi_param SCRIPT_FILENAME $document_root$fastcgi_script_name;
            include        fastcgi_params;
        }
注意报错1:
Aug 12 10:21:01 localhost.localdomain nginx[13328]: nginx: [emerg] getpwnam("nginx") failed解决1:
[root@localhost conf]# useradd -M -s /sbin/nologin nginx注意报错2:
Aug 12 10:22:29 localhost.localdomain nginx[13346]: nginx: [emerg] mkdir() "/var/cache/nginx/client_temp" failed (2: No such file or directory)解决2:
[root@localhost conf]# mkdir -pv /var/cache/nginx/client_temp
mkdir: created directory ‘/var/cache/nginx’
mkdir: created directory ‘/var/cache/nginx/client_temp’
(4)重启nginx
[root@localhost conf]# systemctl start nginx
[root@localhost conf]# systemctl status nginx
● nginx.service - nginx - high performance web server
   Loaded: loaded (/usr/lib/systemd/system/nginx.service; disabled; vendor preset: disabled)
   Active: active (running) since Sat 2023-08-12 10:23:57 CST; 6s ago
     Docs: http://nginx.org/en/docs/
  Process: 13361 ExecStart=/usr/sbin/nginx -c /usr/local/src/nginx-1.22.0/conf/nginx.conf (code=exited, status=0/SUCCESS)
  Process: 13358 ExecStartPre=/usr/sbin/nginx -t -c /usr/local/src/nginx-1.22.0/conf/nginx.conf (code=exited, status=0/SUCCESS)
 Main PID: 13362 (nginx)
   CGroup: /system.slice/nginx.service
           ├─13362 nginx: master process /usr/sbin/nginx -c /usr/local/src/nginx-1.22.0/conf/nginx.conf
           └─13363 nginx: worker process

Aug 12 10:23:57 localhost.localdomain systemd[1]: Starting nginx - high performance web server...
Aug 12 10:23:57 localhost.localdomain nginx[13358]: nginx: the configuration file /usr/local/src/nginx-1.22.0/conf/nginx.conf syntax is ok
Aug 12 10:23:57 localhost.localdomain nginx[13358]: nginx: configuration file /usr/local/src/nginx-1.22.0/conf/nginx.conf test is successful
Aug 12 10:23:57 localhost.localdomain systemd[1]: Started nginx - high performance web server.
LNMP%E7%8E%AF%E5%A2%83"> 三.简单测试LNMP环境
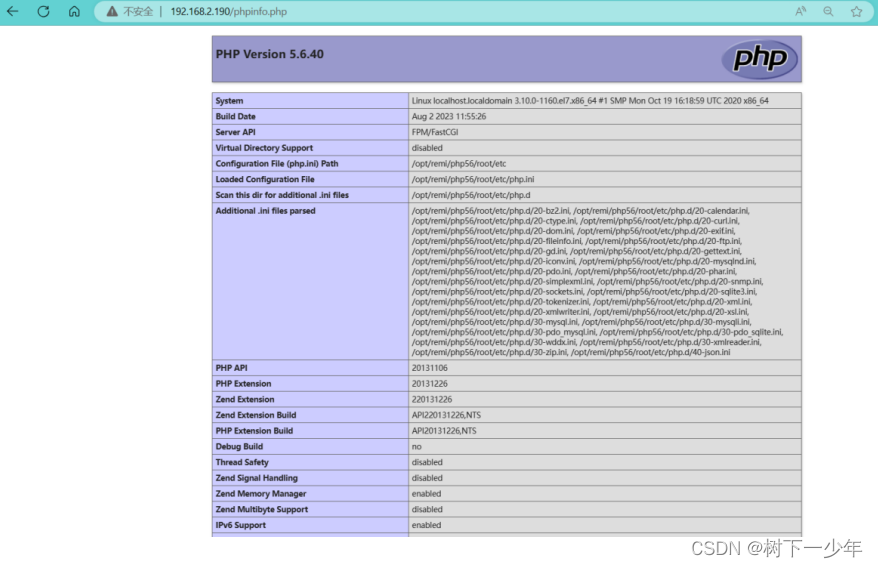
到上面nginx配置文件指定的html目录中新建php文件,"phpinfo();"会显示php环境的相关信息
[root@localhost html]# cat phpinfo.php
<?php
	phpinfo();
?>
[root@localhost html]#